
Volume 22 - Autumn 2006
The German Case Binding
by Peter D. Verheyen
Introduction
The case (Bradel) binding is the most common, general purpose binding structure in use by binders in Germany. What sets it apart from other case bindings is that the cover boards and spine stiffener are joined together with a strip of sturdy paper before covering. This allows the covers to be fit precisely to the textblock, especially at the joint and fore-edge. For this reason the structure is also very well suited to beginners. Books using this structure are generally covered in full cloth, paper, or a combination of the two. The structure is not well suited to leather binding and has been modified for use with vellum.
Adhesives
Adhesives that are used in the process of this binding style include wheat paste, 50:50 PVA/methyl cellulose (or PVA/paste) mixture and straight PVA. Use of synthetic adhesives is for ease of use. Gelatine (hide glue) can be substituted for PVA. Paste is used initially for pasting up the spine, for working the leather, and occasionally adhering the sides. This is because it extends the "open time" and provides "slip." 50:50 mixtures may be used for putting down the sides, and for applying counter linings and fill. They may also be used for casing-in. Straight PVA is used for assembling the case and may be used for applying counter linings and fill. It may also be used for casing-in. The choice of adhesive will depend on such factors as climate, controlling warping, and the materials being used.
Textblock Preparation
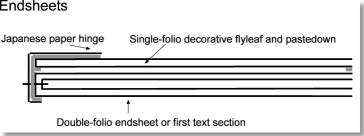 Endsheets
- The endsheets are generally one of two varieties. The first is a single-folio
of paper, decorative or plain, which is very narrowly (2-3mm) tipped onto the
first and last signatures. The other is a double-folio endsheet signature that
is sewn along with the text signatures. A variation of the latter is adding
a tipped-on folio to the double-folio. In both cases, add either a guard of
medium weight Japanese paper or thin cloth. The Japanese paper guard is pasted
out and wrapped around the first and last signatures so that the paper wraps
around the signature on the textblock side by 2-3mm. If using a guard of thin
cloth, tip this to the textblock side of the first and last signatures and then
wrap around the signature. The remainder will be glued down during casing in.
 Sewing
- Thread should be selected so that swell appropriate to the board thickness
is created. To see the effect of swell, wrap different thicknesses of thread
around a pencil as many times as the book has signatures. Some of that swell
will be absorbed by the paper and by rounding. The remainder will create the
swell that is managed by backing and the board thickness. The book can be sewn
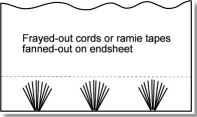
using a linked stitch (unsupported), on ramie or linen tapes, or frayed out
cords. The latter are cords that are untwisted, laid neatly next to each other,
and sewn in the same manner as tapes. Sewing holes should be pre-punched using
a jig for consistency with the kettle stitch 1cm in from edges and the appropriate
number of sewing stations for the size of the book. Generally, three sewing
supports are used, with more used on larger books.
Even a small textblock can be rounded and backed. When making a square-backed textblock, backing is still important. To begin, paste or glue up the spine, making sure that the adhesive is not too thick and is worked between the signatures. This step will ensure a solid textblock. If the textblock was sewn on ramie tapes or frayed-out cords, separate out the fibres, paste out, and fan out onto the endsheet. If the textblock was sewn on cloth tapes, they can be pasted down now or during casing in.
 Rounding
and Backing - If a rounded spine is desired, round the textblock by first
gently massaging into shape, and working the spine from both directions with
a backing hammer with the blows beginning below the centre and then working
towards the shoulder. During rounding, place the thumb along the fore-edge and
fan the hand out across the textblock to help pull the book into shape and prevent
it from "bouncing" while using the hammer. Flip the book over and repeat from
other side. Repeat as needed. Blows should be gentle, yet firm.
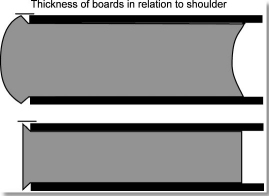 To back the
book, mark a distance twice the board thickness from the shoulder. Board thickness
will be determined by the size of the book and amount of swell, with the thickness
of the board equal to the height of the shoulder after the book has been backed.
This structure is ideal for smaller, delicate, books. Board thicknesses can
range from 40 - 60 pt.
Place the book in a job backer, or between boards and in backing press, with the edge of the backing cheeks or boards lined up the marks made earlier. With the backing hammer, backing tool, folder, and/or fingers, work the spine of the book so that the shoulder creates a 45° angle to the textblock.
While the book is still in the backing press, line the spine between tapes, and tape and kettle stitch with thin cloth or paper. Do not line between kettle stitch and book edge. PVA can be used as an adhesive for this.
 Edge
Decoration
- Edges can be decorated by burnishing, colouring, graphite, or gilt. John Mitchell's A Craftsman's Guide to Edge Decoration is an excellent guide to this topic. Most traditional binding manuals will also have chapters on this topic.
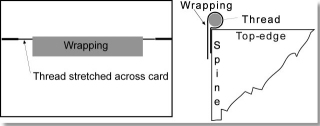
Endbands - Endbands can be hand-sewn or made by wrapping a thread of the appropriate thickness with paper, cloth, or leather. Scraps of old marbled or paste papers can be especially attractive. The height of the endbands should be slightly lower than squares. The stuck-on endbands should not extend beyond the kettle stitch. Most traditional binding manuals will also have chapters describing simpler sewn endbands. If the endbands are sewn, apply a cloth lining over the threads from the edge to the kettle stitch. After the endbands have been applied a paper spine lining can be applied along the length of the spine slightly overlapping the endbands.
 Making
The Case
Boards - The board thickness is determined at the time of backing and equals the depth of the shoulder so that the shoulder and boards create a flat surface.
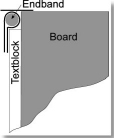 Cut
boards to size so that the height of the boards equals the height of the textblock
plus the endbands. If we want to be perfect, this would equal the height of
the textblock plus 2 board thicknesses. The width of the boards should be the
width of the textblock plus 1 cm. This may seem very large now, but once the
case is assembled and rounded (but before covering) it will be trimmed to the
proper width so that we have even squares all around.
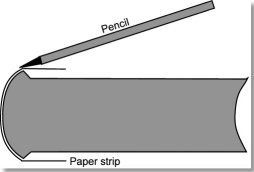 Measuring
the Spine - To measure the width of the spine, pull a strip of paper across
the widest part of the spine, usually the tapes or headbands, and mark exactly
at the shoulder on both sides. Double check at the other end to make sure the
spine is not uneven. If there is a difference choose the larger of the two.
Cut a spine stiffener out of card-weight paper (10pt) to that width and slightly
longer than your boards, grain running parallel to the spine. For smaller square
backed books, I use the same thickness of card for the spine stiffener as for
rounded books. This thickness may be increased on larger books.
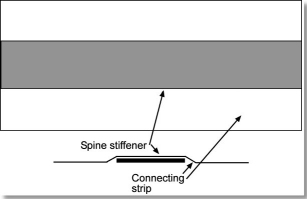 Cut
a connecting strip of 80lb paper to a width of spine stiffener + 6cm, and slightly
longer. Apply PVA to spine strip and centre on connecting strip. Rub down with
folder, turn over, and accentuate edge of spine strip with folder.
Assembling The Case - The groove between the board and spine stiffener will be between 5-7mm in width dependent on the thickness of the covering materials. If you use paper it can be slightly narrower; if you use thick cloth it will have to be wider. Initially, it is a good idea to mark this distance with dividers, but within a short time you should be able to measure this distance by eye. You will also want to have a narrow strip of waste board handy to line up your boards with along the top edge.
 Arrange
your two boards and spine strip in a step-like manner with the spine piece on
top, paper side up (card side down). Brush adhesive on all three, flip spine
piece around and brush on some more. Align your first board with your marks
on the spine piece, then using your piece of waste board as a guide put down
the other board and rub the paper down. The boards must be parallel to the spine
strip and level with each other.
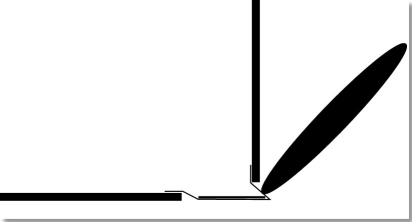 Next, cut the
spine stiffener and connecting strip to the height of the boards with scissors.
Fitting the Case - Fit the case by first sharpening the joints of the case with a bonefolder.
If appropriate, round by rolling the case gently, but firmly, in the ball of the hand over the edge of the bench. It is important to round the spine evenly so that it matches the round of your book. If overly rounded, the spine can be flattened by rubbing down with a folder or fingers.
Fit the cover to the book, marking the top of your case and book on the spine and spine stiffener. Using a knife or sharp pencil mark the fore-edge square. This will help give you an even square on all three sides of the paste-down even if the book is not quite square. The top and bottom edges are always parallel. Trim off the excess of the fore-edge.
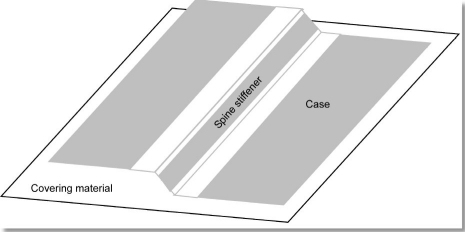 Covering
- Cloth and paper are the materials of choice for covering. When vellum is used,
the case construction is modified to reduce the chances of warpage. See the
bibliography for a full description of the technique. It is not recommended
for use with leather, as described. The directions for covering that follow
are for a "full" binding but can easily be adapted for a ¼ binding.
Select your covering material and cut to size allowing for 1.5cm turn-ins all around. This may seem very tight, but is more than adequate. For covering the case I like to use a 50/50 mixture of PVA and "thicker" methylcellulose because of its longer working time. Glue out the entire piece of material and allow it to expand. Then, with the cover facing down (inside of boards facing you), put down the first board making sure the turn-ins are even on all three sides.
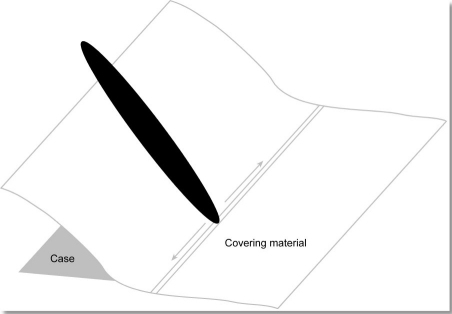 Next, flip
over onto a new piece of wastepaper using your arm to support the glued-out
material. Smooth the covering material down on the first board, work the covering
material into the joint carefully making sure it adheres to the edge of the
board, continue smoothing across the spine (rubbing down along the edges), and
back up the board, then smooth out across the other board. Smooth out the material
with your folder, but put a piece of clean paper on top of the cover first to
prevent marking it with the folder. Lift the cover, discard your wastepaper,
and lay it on your clean bench, covering side down.
Cut the corners, leaving 1.5 board thicknesses. Then, turn-in your top and bottom edges first, beginning at the spine, then pinch the corners and turn in your fore-edges.
The image below shows what will happen if you do not work the material into the joints well. The result will be that the fore-edge of your case will be shortened and the joint as well, leading to problems in opening the cover.
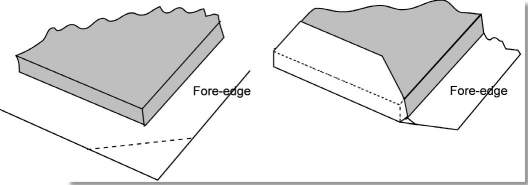 When dry, trim
out the inside of your case so that your turn-ins are even, being careful not
to cut through at the spine.
Any stamping on the spine should be done at this point. If applying a label, do this after casing-in.
Casing-In - Re-round and shape the case so that it fits well around the textblock. Case-in using brass-edged boards, rods, or a bone folder to rub in the joint (be careful not to tear your material). Use the first two if you have a press. If you don't, use your folder. Before placing the book in the press, insert a piece of card known as a "fence" between the pastedown and your flyleaf. This will help absorb some of the moisture and prevent the turn-ins from impressing themselves onto the flyleaves. Place the book in the press, giving a good hard nip for about 20 seconds or so, then take out, change the cards and let dry under weight.
 Completing
- When dry, set the joints by opening the book cover to 90 degrees and, supporting
it with the hands, push the board downward to set the joint. This will help
the book open nicely without causing the flyleaves to pull upwards.
Peter D. Verheyen © 2006
Selected Bibliography
German Case and Bradel Binding (English)
Denninger, Johann C. The "Temporary" Binding of Alexis Pierre Bradel. London: Designer Bookbinders, The New Bookbinder, Vol. 16, 1996
Roberts, Dr. Brian A. Herstellung der Einbanddecke (German-style case construction). Toronto: Canadian Bookbinders and Book Artists Guild, Canadian Bookbinders and Book Artists Guild Newsletter, Vol. 10, No. 2, Summer 1992
Young, Laura S. Bookbinding & Conservation by Hand: A Working Guide. New Castle, DE: Oak Knoll Press, 1995.
Zeier, Franz. Books, Boxes, and Portfolios. New York, NY : Design Press, 1990.
German Case and Bradel Binding (German)
Buge, Siegfried. Pappband, Ein Brevier für Buchbinder und Bücherfreunde. N.P. Hans Christians Verlag n.d
Henningsen, Thorwald. Das Handbuch für den Buchbinder. Stuttgart: Max Hettler Verlag. Lüers, Heinrich. Das Fachwissen des Buchbinders. Stuttgart: Max Hettler Verlag, 1943.
Moessner, Gustav. Die TÄglichen Buchbinder Arbeiten. Stuttgart: Max Hettler Verlag, 1969.
Wiese, Fritz. Der Bucheinband. Hannover: Schlütersche Verlagsanstalt und Druckerei, 1983.
Zahn, Gerhard. Grundwissen Für Buchbinder. Itzehoe: Verlag Beruf + Schule, 1990.
Endbands / Edge Decoration
Greenfield, Jane and Hille, Jenny. Headbands: How to work them. New Castle, DE: Oak Knoll Books, 1990.
Mitchell, John. A Craftsman's Guide to Edge Decoration. Sussex, UK: Standing Press Ltd., 1993.
Variations Verheyen, Peter D. The Edelpappband, or "Millimeter" Binding. The Bonefolder: an e-journal for the bookbinder and book artist. Vol. 1, No. 2, Spring 2005.
Verheyen, Peter D. Vellum on Boards. The Book Arts Web.
Peter D. Verheyen began his involvement in the book arts while a work-study student in the conservation lab at the Johns Hopkins University Library. Interned in the conservation lab of the Germanisches Nationalmuseum in Nuremberg, Germany, 1984 and 1986. Formal apprenticeship in hand bookbinding at the Kunstbuchbinderei Klein in Gelsenkirchen, Germany, passing examinations in 1987. Studied at the Professional School for Book Restoration at the Centro del bel Libro in Ascona, Switzerland in 1987. Mellon intern in book conservation at the Folger Shakespeare Library, 1988. Worked in Chicago with Heinke Pensky-Adam at Monastery Hill Bindery and as assistant conservator to William Minter. In 1991 he began work as assistant conservator at the Yale University Library. In 1993 he became rare book conservator at the Cornell University Library, before establishing the rare book conservation lab at the Syracuse University Library. He is a past Exhibitions and Publicity Chair for the Guild of Book Workers. His bindings have been exhibited widely with the Guild, its regional chapters, and in invitational and solo exhibitions. In 1994 he founded Book_Arts-L and shortly thereafter the Book Arts Web at . He is also publisher of The Bonefolder: an e-journal for the bookbinder and book artist, an online journal he founded with colleagues in 2004.
